Introduction
Today I want to take you through a Continuous Improvement idea that can help you achieve challenging results in a fast and efficient way. It is called 3P, Production and Process Preparation, and brings discipline and structure to the design of any new product or process development.
3P is a powerful methodology originally used in manufacturing to streamline processes and boost efficiency. But here's the beauty of it – its principles are incredibly versatile and can be applied to most environments to enhance everything from administrative processes to new product design.
Here is a quick rundown of what we'll cover in this blog:
- Identifying Scope: We'll start by clearly defining the project scope. It's all about setting ourselves up for success right from the beginning.
- Developing Seven Alternatives: Next, we'll brainstorm multiple alternatives. This step is crucial for sparking creativity and ensuring we consider all possible solutions.
- Evaluating Seven Alternatives: Once we have our alternatives, we'll evaluate them based on specific criteria. This will help us weed out the less viable options.
- Selecting the Better Three Alternatives: From our evaluations, we'll narrow down to the top three options. These will be the most promising paths forward.
- Constructing Models/Operations: Then, we'll build detailed models of our top three alternatives. Think of this as creating a blueprint for success.
- Simulating Three Alternative Processes: We'll test these models through simulation to see how they perform in real-world scenarios. This step is about identifying potential issues before they arise.
- Selecting the Best Design and Process: After our simulations, we'll choose the best design and process. This is our winning solution.
- Refining Process at a Glance: Finally, we'll refine our chosen process. Continuous improvement is key here – we'll make adjustments to ensure optimal performance.
- Follow-Ups: Last but not least, we'll discuss the importance of follow-ups. Monitoring and evaluating our implementation is essential for sustained success.
By the end of this discussion, you'll have a solid understanding of how to apply 3P to your own projects, making your operations more efficient, effective, and innovative.
Ready to get started? Let's get going by taking you through the nine steps.
Identify Scope and Voice of Customer
The first and arguably the most critical step of 3P is to: Identifying Scope. This step involves defining the boundaries of the project or process you are looking to improve, using 3P methodology. It's important to clearly identify the goals, objectives, constraints, and stakeholders involved.
First off, why is defining the scope so crucial? A well-defined scope helps us set clear boundaries for what the project will cover and, equally important, what it will not. It aligns everyone involved on the objectives, deliverables, and expectations, ensuring we’re all on the same page from the start. It is also important to gain an understanding of the overall customer requirements and list any items that are critical to them.
Here are a few tips:
- Engage Stakeholders Early: Talk to everyone who will be impacted by or involved in the project.
- Prioritise Objectives: Not all goals can be achieved simultaneously. Prioritise the most critical objectives that will deliver the highest impact. This helps in focusing efforts and resources where they are needed most.
- List items that are critical to the customer: Must haves, and items that would delight them..
By taking the time to clearly define the scope and voice of the customer we lay a solid foundation for the rest of our 3P process. It sets us up for success by ensuring we have a clear, shared vision of what we are aiming to achieve.
Develop Seven Alternatives
Now that we’ve clearly defined our project scope, it’s time to put our creative hats on and develop seven alternatives. This step is all about generating a diverse range of potential solutions. The more ideas we have, the better our chances of finding the optimal solution. Diverse perspectives are invaluable in the ideation process. They bring in a range of experiences, knowledge, and viewpoints that enrich the discussion.
You might wonder, why seven alternatives? Well, it’s crucial to brainstorm multiple alternatives because it pushes us beyond the obvious choices and encourages creative thinking. By exploring a variety of options, we increase our chances of discovering innovative and effective solutions. Think of it like casting a wide net – the more we explore, the more likely we are to catch the best idea. In general, it is best to sketch up each idea on an A4 piece of paper with some notes. It can also be useful to give each idea a name that is memorable so that it is easy to refer to.
Evaluating Seven Alternatives

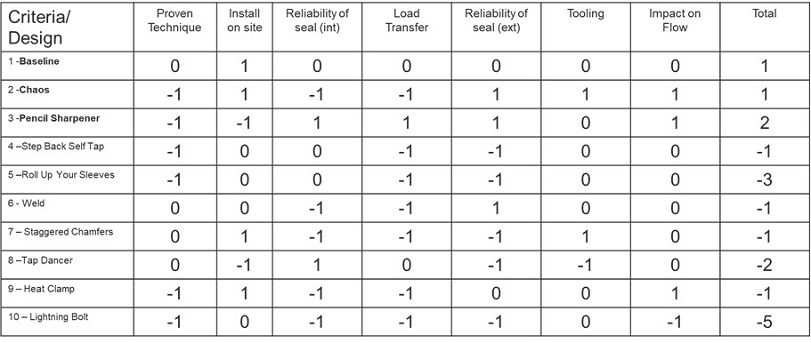
Here, you assess the strengths, weaknesses, feasibility, and potential impact of each of the seven alternatives. The evaluation helps in understanding the merits and drawbacks of each option. It is best to create an evaluation checklist specific to your project for this purpose.
Selecting the Better Three Alternatives
From the seven alternatives, you can then narrow down the selection to the three most promising options based on the evaluation criteria established in the previous step.
Constructing Models/Operations
 This step involves creating physical or virtual models of the selected three alternatives. We want to use creativity before capital at this stage so just use everyday materials like cardboard and tape in your construction.
These models could include mock-ups, prototypes, or simulations to better understand how each alternative would function in practice.
Simulating Three Alternative Processes
Using the constructed models, you simulate the processes associated with each of the three alternatives. This simulation helps in identifying potential issues, optimising workflows, and making informed decisions. In a previous life I constructed full size pieces of equipment out of cardboard pallet protection pieces like a large toy construction set. This allowed us to easily layout equipment and try out different configuration because the models were light and easy to move. It was amazing to see a factory workspace made of cardboard!
Selecting the Best Design and Process
Based on the simulations and evaluations, you then choose the single best design and process among the three alternatives.
This selection is made considering factors such as efficiency, quality, cost-effectiveness, and alignment with the project goals.
Refining Process at a Glance
Once the best design and process are selected, this step involves refining and fine-tuning the chosen solution to address any remaining issues or optimize its performance further.
Follow-Ups
Finally, after implementing the selected design and process, it is crucial to conduct follow-ups to monitor its performance, gather feedback from stakeholders, and make any necessary adjustments or improvements over time.
Conclusion
The Continuous Improvement idea of 3P is a fantastic way to create processes by anticipating and avoiding waste up front. It is wonderful way to get stakeholders involved upfront and get buy in for the ultimate process design.
If you are not already doing so, I encourage you to start using 3P when you have the next opportunity to create a new product or process.


